@frontity/wp-comments
API reference of `@frontity/wp-comments` package
Comments package that adds integration for WordPress native comments.
Installation
Add the wp-comments package to your project:
Settings
In WordPress
In order to use this package, you will need to add a single line of configuration to your Wordpress installation:
This filter enables creating comments for anonymous users via the REST API.
You can add this snippet directly in your theme's functions.php file or use a Code Snippets plugin.
In Frontity
This package doesn't have any configuration. It just needs to be added to the packages array in frontity.settings.js.
frontity.settings.js
Usage
Getting comments of a post
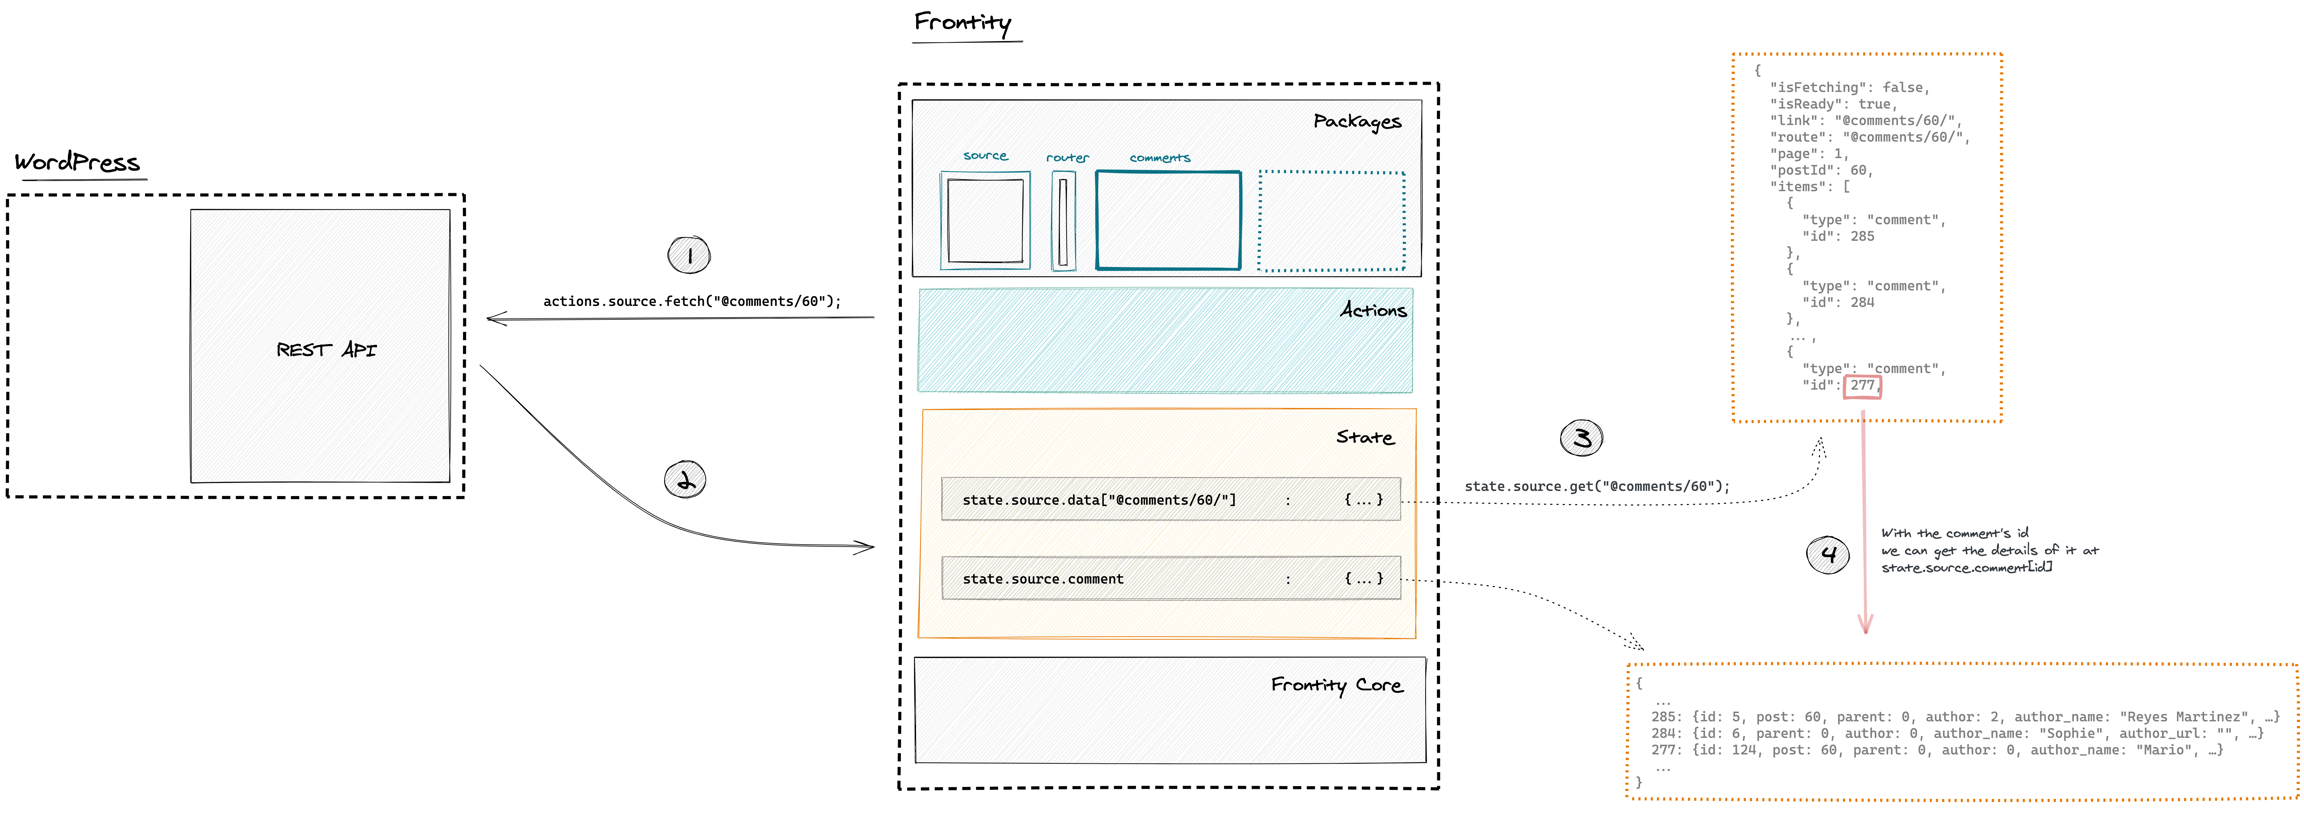
We can use the @comments/:id handler to fetch all the comments of a specific post (actions.source.fetch("@comments/60")).
This data will be populated to the state so then we can do state.source.get("@comments/60") to get the ID's of these comments.
With each ID we can get the details from the state at state.source.comment[id]`.

Take a look at this diagram to learn more about this.
Sending new comments for a post
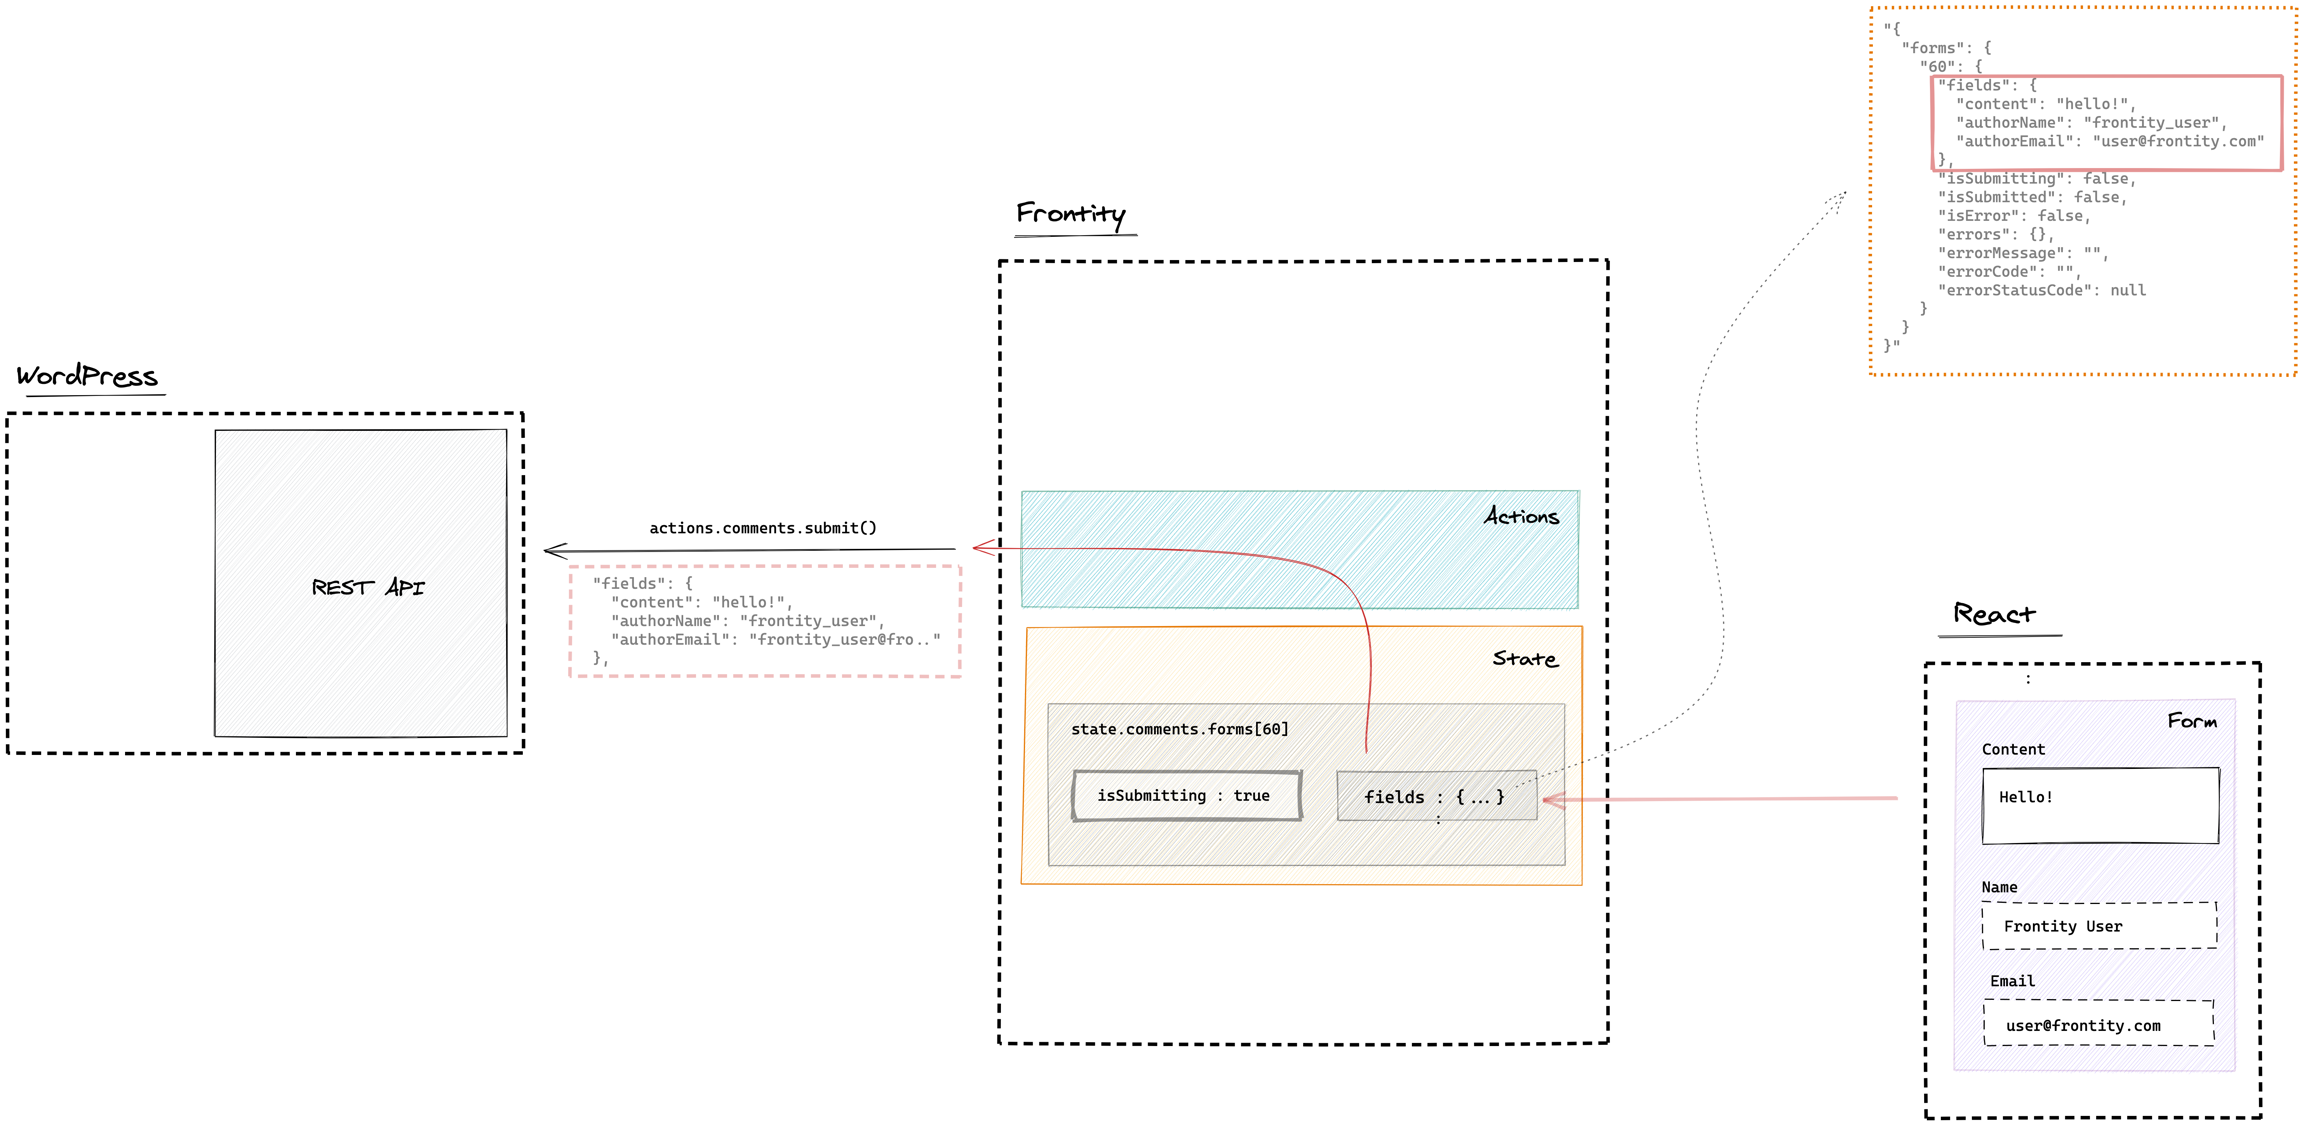
Every post with a comments form (to send comments) will use state.comments.forms[postId] to store the data of the comment and the submission status.
The data at state.comments.forms[postId] can be updated through the action actions.comments.updateFields().
To send new comments you can use the action actions.comments.submit() which will send the data available at state.comments.forms[postId].fields.
The submission status will be stored under under state.comments.forms[postId] and if there are errors they will be available at the properties errorMessage, errorCode and errorStatusCode.

Take a look at this diagram to learn more about this.
API Reference
Handlers
@comments/:id
@comments/:idThis wp-source handler gets all comments published in the specified post (using its ID) and creates a tree structure with comments and their replies in the data object.
For example, to fetch all comments that belong to the post with ID 60 you would do:
This would fetch all comments associated with that post and populate a data object inside the state (frontity.state.source.data["@comments/60/"]) with a tree structure of comments and replies, sorted by date (most recent first).
Have a look at the section Getting comments of a post to learn more
To access the fetched comments you could use something similar to this example:
State
state.comments.forms[postId]
state.comments.forms[postId]The wp-comments package stores a map of objects by post ID in state.comments.forms. Each of these objects represents one comment form. These objects are intended to be used as the state of React <form> components and contain the input values as well as the submission status. They have the following properties:
Name
Type
Description
isSubmitting
boolean
The comment hasn't been received by WP yet.
isSubmitted
boolean
The comment has been received.
isError
boolean
The request has failed.
errorMessage
string
Failure reason.
errorCode
string
The error code. Those are defined internally in the WordPress REST API. Example: rest_comment_invalid_post_id
errorStatusCode
number
The HTTP status code that might have been received from the WordPress REST API.
state.comments.forms[postId].fields
state.comments.forms[postId].fieldsThe following map of fields, representing the current field values that have been input in the form rendered in the given post. The content of this property is updated using the updateFields() action described later.
Name
Type
Required
Description
content
string
yes
Content of the comment.
authorName
string
no
Author's name.
author
number
no
The ID of the author.
authorEmail
string
no
Author's email.
authorURL
string
no
URL of the author's site.
parent
number
no
ID of the comment to which this one responds. Default Value: 0
See the section Sending new comments for a post to learn more.
state.source.comment[id]
state.source.comment[id]This is the portion of the state where the comments are stored after being fetched from the REST API or POSTed through the comments.submit() action.
Thanks to the handler @comments/:id you can get the ID's of the comments in a specific post.
With this list of ID's you can get the details for each one at state.source.comment[id].
See the section Getting comments of a post to learn more.
Example
Check a fully working example of this in this wp-comments demo.
Actions
actions.comments.updateFields()
actions.comments.updateFields()Update the fields of the form specified by postId. This action simply updates what is stored in state.comments.forms[postId].fields with the given values.
If no fields are specified, the form fields are emptied.
These fields will be used by actions.comments.submit() when submitting the comment.
Syntax
Arguments
Name
Type
Required
Description
postId
number
yes
The ID of the post where the comment will be published.
comment
object
no
Object representing the fields of the comment to be updated. The fields of this object are the same than the ones at state.comments.forms[postId].fields
See the section Sending new comments for a post to learn more.
actions.comments.submit()
actions.comments.submit()This asynchronous action publishes a new comment for the post specified by postId. It submits the fields stored in the respective form (i.e. state.comments.forms[postId]) or the fields passed as a second argument. If fields are passed, those replace the current values stored in state.comments.forms[postId].fields.
After calling this action, you can access state.comments.forms[postId].isSubmitted property (described above) to determine the submission status.
Take into account that this action does not validate input. This means requests are made even though some fields are empty or have invalid values. If that is the case, WordPress will return an error message and populate the error status accordingly.
Syntax
Arguments
Name
Type
Required
Description
postId
number
yes
The ID of the post where the comment will be published.
comment
object
no
Object representing the comment. The fields of this object are the same than the ones at state.comments.forms[postId].fields
Take a look at the section Sending new comments for a post to learn more.
Demo
This short video demonstrates the usage of the @frontity/wp-comments package.
The project used in the video is available here.
Last updated